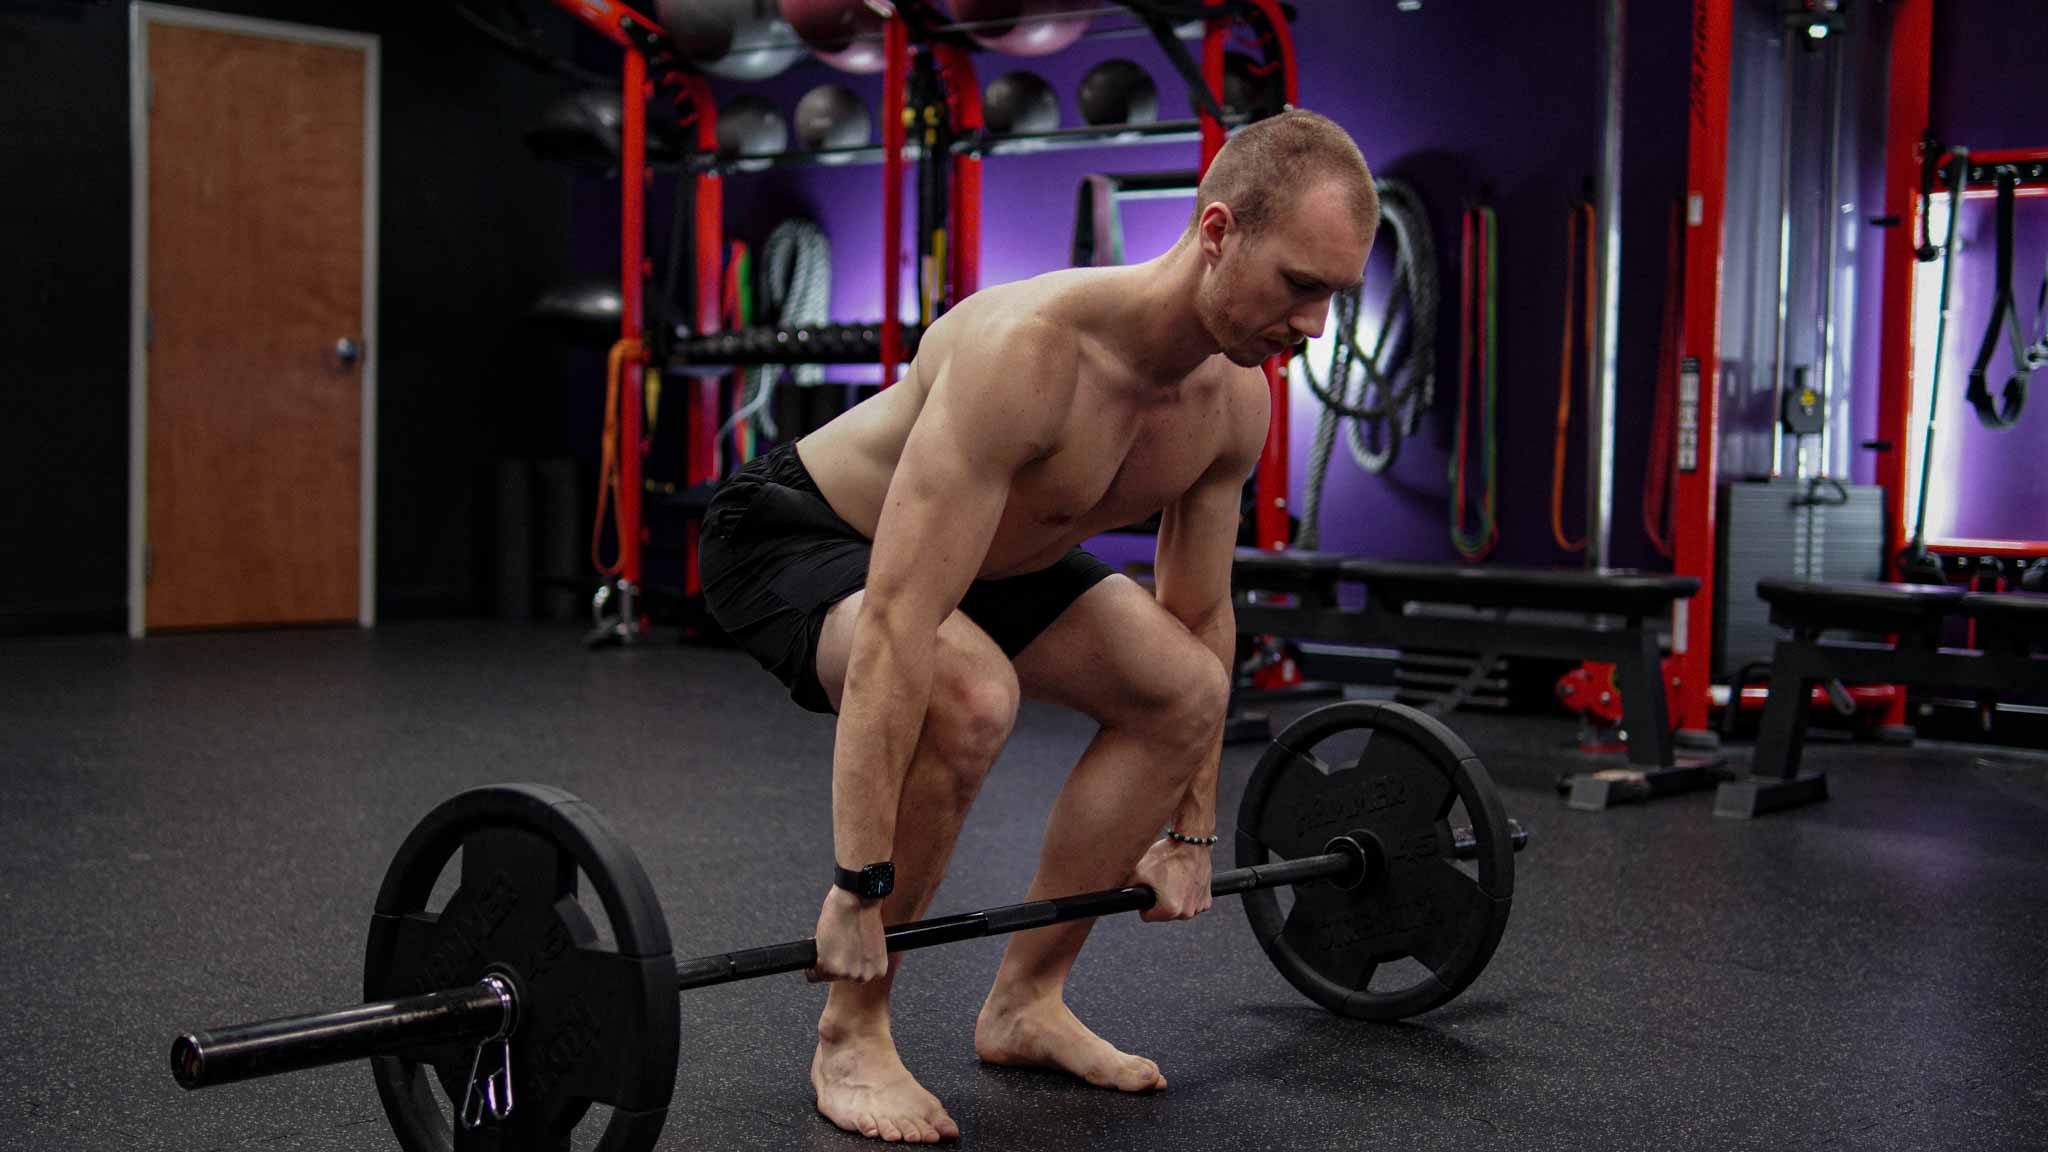
Strength testing is vital to designing a good strength training program. Also, it allows the athlete to understand where they currently are. That way, they know where they are going.
Strength testing also points out areas of focus. An athlete may have a great squat maximum but cannot perform an overhead pull. When the trainer or coach sees this deficiency, they can target upper body strength above lower body strength in their programs.
A trainer or a coach may also be able to predict injury risk with strength testing. When utilizing maximum testing, an athlete's mechanics tend to break down. Athletes play sports near maximal intent. Maximum strength testing will give the practitioner a good understanding of what happens to the athletes body in that maximal intensity environment. An athlete may be able to perform a perfect squat unloaded. However, when they attempt a max lift, many things fall apart. Having the background of an athlete’s body's behavior when pushed to its limits is critical.
What Do I Look For in A Good Strength Test?
Not all strength tests are created equal. I don’t like many conventional strength tests. I certain tests because there is a lot of data to provide me with normative values. These values allow me to understand where my athletes are at in comparison to other athletes their gender, age, and size.
Apart from commonly used tests, I choose strength tests that are valid. The validity of a test is whether or not it measures what is supposed to be measured. If I want to measure hip extension strength, then a maximal bench press would not be a valid test.
I also need to choose a test that is reliable. That means that the results can be repeated. Also, new results should be able to be directly compared to the old results to show improvement or loss. There should be no caveats (i.e. the athlete did not reach the appropriate range of motion on the first attempt because of improper coaching/poor test selection). The tests should be simple and replicable.
The test needs to be relevant. If the athlete is a middle aged woman who wants to lose five pounds of body fat, a maximal bench press test may not be relevant to their goals. It may also not be worth the time or effort if this woman never mentioned upper body strength as a concern. If the athlete is a high school lacrosse player, a maximal squat test may be appropriate.
The last criteria to determine a useful strength test is the skill level needed to complete the test. If it will take a day to demonstrate, explain, and cue the test, it is not a good test. Simple and replicable is the goal.
What Strength Tests Should You Do?
Choosing which strength tests to do is difficult. There are a lot out there. There are reasons to do all of them. However, you must choose tests that meet the concepts of validity, reliability, and relevancy that we mentioned earlier.
Also, I choose tests that I believe are the most important for providing me information on biomechanical efficiency and joint health. You’ll see that I choose certain strength tests for these reasons.
Overhead Pull
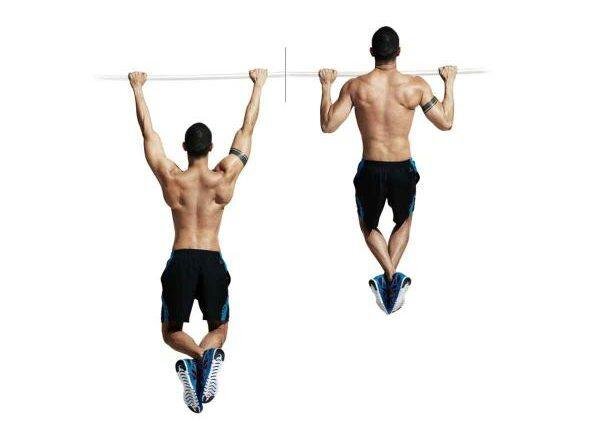
The Overhead Pull Assessment, or Pull Up, is my choice for upper body strength testing. I do not use the bench press or push-up. I do not believe that the bench press or push-up assessment are great tests. They do not provide me with as much information on an athlete's biomechanics (especially the bench press). They also do not assess posterior chain strength and stability as well as the Overhead Pull.
The reason I choose the Overhead Pull is because it assesses posterior chain (back) strength. This is a more important indicator of spine and shoulder health. The test is also very low risk. The chance of injury is close to zero. It can be attempted by almost anyone.
The relevancy of the Overhead Pull is also very high for almost anyone. Strength to weight ratios are important at understanding long-term joint health potential. There is almost no better test at analyzing a person's strength to weight ratio than being able to do an Overhead Pull.
The test also does not require a spotter. So, I can take a video of the test and analyze the biomechanics. The Overhead Pull is very telling at where an individual's movement compensations are in their shoulders. This, on top of their results, will factor heavily into my programming for them.
How to Perform The Overhead Pull Assessment
- A full warmup including hip, mid-spine (shoulder blade musculature), and core activation.
- Give yourself one attempt to complete as many Overhead Pulls as possible.
- Successful Reps Include:
- Chin reaches over the bar.
- Elbows return to straight after each rep.
- Failure occurs when you can no longer pull your chin above the bar.
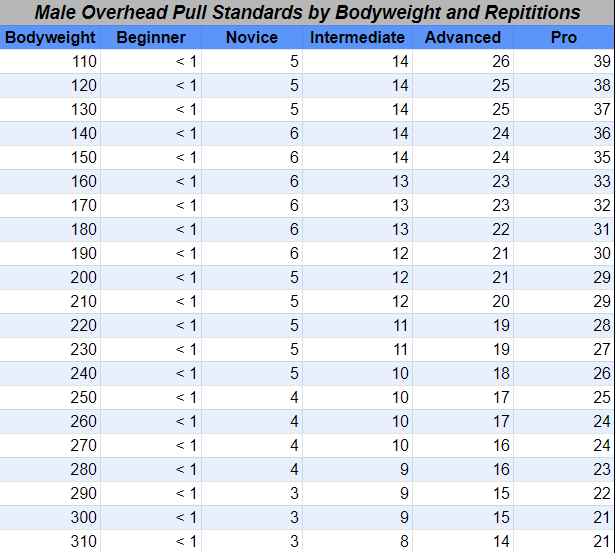
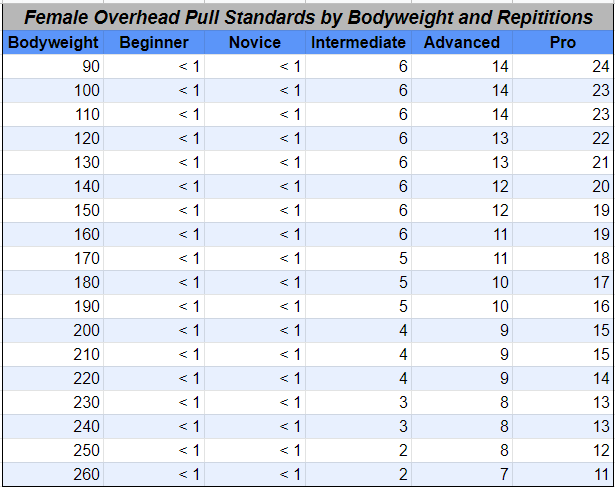
If you choose the Overhead Pull as your test for upper body strength, here are the values you should be comparing yourself to:
Barbell Back Rack Squat
My choice for lower body strength is the Barbell Back Rack Squat, or Back Squat. The Back Rack Squat is not as simple as the Overhead Pull. Also, the injury risk is higher. This is because you have to put a heavy load on your spine. The hip mobility, spinal stability, and movement quality requirements are fairly high with this exercise. I always do this test after I’ve done an FMS analysis on my athlete. If I believe they will fare well on the Back Rack Squat test, I will have them perform it.
The reason I choose the Back Rack Squat is for the same reasons it is challenging for less experienced athletes. It is not only a great test of quad and hip strength, it is also a great test of pelvis and hip stability.
Maximal intensity on this test will further show me where the athletes' biomechanics begin to break down. Do their arches collapse? Do their knees turn in? Does their back round or arch on descent? All of these questions become answered under heavy load.
If the athlete is less experienced, I will test them in a 3-5 rep range. Higher reps and lesser load decreases the chance of injury. I will still be able to analyze the biomechanical breakdown while ensuring I do not hurt a new athlete.
For more experienced athletes, I do a 1 rep max test. The athlete must present near perfect squat technique if I am going to attempt a 1 rep max test with them. Here, under true max load, the risk of injury goes up. Biomechanical failure has to be near zero. I would not do this test with a brand new athlete.
How to Perform A Max Barbell Back Rack Squat Test
- A full warmup including hip, mid-spine (shoulder blade musculature), and core activation.
- Perform 10 warm up reps with an empty barbell.
- Perform 5 Repetitions at 50% of your projected 1RM.
- 3 Minutes Rest.
- Perform 2 Repetitions at 80% of your projected 1RM.
- 4 Minutes Rest
- Perform 1 Repetition at 90% of your projected 1RM.
- 5 Minutes Rest.
- Perform 1 Repetition at 95% of your projected 1RM.
- 5 Minutes Rest.
- Perform 1 Repetition at 100% of your projected 1RM.
- 5 Minutes Rest.
- Perform 1 Repetitions at 105% of your projected 1RM.
- Continue this process until you are either happy with the result or have 2 failed attempts at the same weight.
If you are less experienced and believe a 3-5RM max test is better for you, use this protocol:
- A full warmup including hip, mid-spine (shoulder blade musculature), and core activation.
- Perform 10 warm up reps with an empty barbell.
- Perform 5 Repetitions at 40% of your projected 1RM.
- 3 Minutes Rest.
- Perform 3 Repetitions at 60% of your projected 1RM.
- 4 Minutes Rest
- Perform 3 Repetition at 80% of your projected 1RM.
- 4 Minutes Rest.
- Perform 3-5 Repetition at 85% of your projected 1RM.
- 4 Minutes Rest.
- Perform 3-5 Repetition at 90% of your projected 1RM.
- Continue this process until you are either happy with the result or cannot complete more than 3 repetitions.
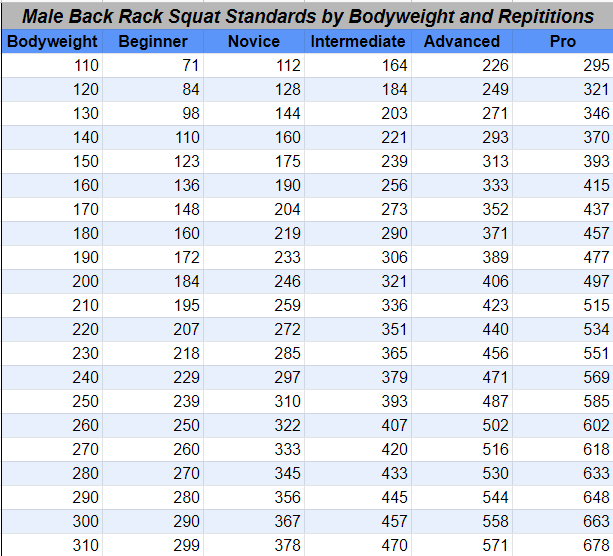
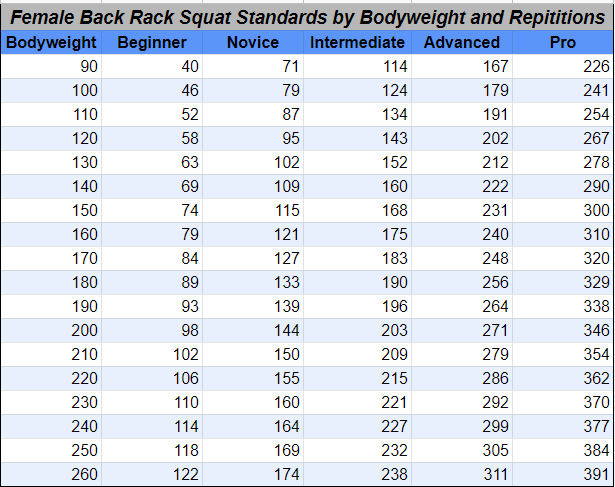
If you choose to attempt a maximal Back Rack Squat test, here are some figures to compare your results to:
Forearm Bridge
The last test I perform with my athletes to assess their strength is a maximal duration Forearm Bridge assessment, or plank.
The Forearm Bridge is a great test at understanding an athlete’s core stability. It is nearly impossible to get hurt. The limited load makes it safe. The simple positioning makes it reliable.
Nearly anyone can perform this assessment. So, the normative values span across many age groups.
With this test, I can also assess an individual's spinal mechanics. What does their upper spine do as they try to brace their core? Can they brace their core at all? How much pelvic tilting can they achieve? At what point does their core fail? What does this failure look like? Do they have an asymmetrical weight shift? All of these questions get answered during this test. Fortunately, unlike the Back Rack Squat, these biomechanical failures will rarely result in injury. Making this test safe and reliable.
How to Perform the Forearm Bridge Assessment
- A full warmup including hip, mid-spine (shoulder blade musculature), and core activation.
- Once prepared, give yourself one attempt to hold the Forearm Bridge position for as long as possible.
- Failure Is:
- Knees touching the ground.
- Moving the feet in any direction.
- Lifting of the hips to remove pressure on the core.
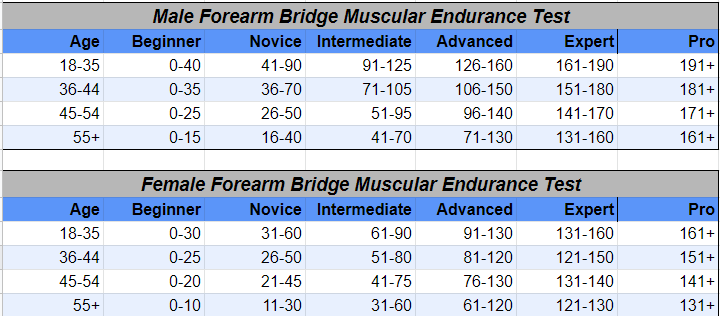
If you decide to perform the Forearm Bridge assessment, here are some values to compare yourself with:
Where do you rank?
References
Strand, S. L., Hjelm, J., Shoepe, T. C., & Fajardo, M. A. (2014). Norms for an Isometric Muscle Endurance Test. Journal of Human Kinetics,40(1), 93-102. doi:10.2478/hukin-2014-0011
Walker, O. (2020, July 21). 1RM Testing. Retrieved October 23, 2020, from https://www.scienceforsport.com/1rm-testing/
Weightlifting Strength Standards. (n.d.). Retrieved October 23, 2020, from https://strengthlevel.com/strength-standards